Showing posts with label sourdough. Show all posts

Friday, 22 March 2013

Malted grain, multiseeded sourdough loaf - for friends

There, you see, I haven't forgotten all about bread, although I'm eating less of it in my attempt to fit into my clothes better. That's as may be, but on Saturday night we have people coming for dinner. I told you I was going to get some mileage out of this!

I love having people round for meals, although we don't do it that often. It's the opportunity to think a bit more carefully than usual about what we might eat, and an excuse to fiddle around in the kitchen even more than normal.

I'm doing some dippy, mezze type things for a starter - going to give some Pistachio Dukka a go, and may be re-run the Cambodian Wedding Day dip that was such a massive hit a few months ago. There may also be some hummus involved - lemony, ordinary, and beetroot and walnut. These will all be courtesy of Hugh F-W and the wonderful Veg Everyday which I'm still finding hugely inspirational.

To go with of course, I need bread. I could do flatbreads on the day, but however impressive, the thought of flinging dough and flour around at the last minute to make them fresh (which is when they are best) when I could be hustling the kids into bed, hoovering the dog and trying to find some matching cutlery serenely sipping a G&T as I apply the final touches to my make up (does anyone do that? Please let me know if you do!) is not appealing to me at the moment so I am breaking out my sourdough starter to make some proper sourdough bread for the occasion.

This is as opposed to the yeasted loaves I've been making, which I wrote about a couple of months back. This method uses no dried yeast, and just uses the starter as the raising agent. I'm following the method that I learned on my fantastic River Cottage Christmas baking course taught by Aiden Chapman, when we made a delicious cranberry and orange loaf using this method. It is as easy as can be - barely any kneading, more loving stirring, then some folding, over the course of a few hours. The dough can then be proved in the fridge for up to 3 days - and indeed Aiden recommends this to allow the dough to develop more flavour. On the Bread course, we didn't have the opportunity to test this out but the bread was still mighty fine.


A word of warning now, though - If you've got people coming for dinner on Saturday and don't have a sourdough starter going, you're not going to be able to join in I'm afraid, but for easy instructions on making a starter, the post I wrote is here. May be next time. And while we're talking about time, you will need to be able to tend to your dough once an hour over a 5 hour period. The dough can then sit in the fridge for 3 days (as I said above) ready to be baked as you want it.

As my starter had been languishing in in the fridge for a few days, I got it out on Tuesday, got it up to room temperature, chucked half of it away. added some more flour (I used rye) and water to get it going, gave it a good stir and left it to do its thing till Wednesday morning.


For 500g flour, you will need 10 g salt, 125g of your starter and 325g water. You can add in any extras you want.

Malted grain, multiseeded sourdough loaf

1kg malted grain flour (I had some Doves Farm in the cupboard)
20g salt
100g mixed pumpkin seeds, sunflower seeds and sesame seeds
250g sourdough starter
650g water

Put all the dry ingredients in a bowl and stir together. Combine the starter and water, and then carefully mix into the dry ingredients.


Cover the bowl with a tea towel and leave. Yes, that's right, no kneading required!


An hour or so later (actually, I ended up leaving mine for closer to 2 because I had to take the kids to school and walk the dog), literally all you need to do is remove the tea towel, and fold the dough over on itself, then press gently back into the bowl.


Cover and leave for another hour, when you fold the dough again and leave for another hour. Each time you do this you will see that the dough is getting smoother and more coherent as the gluten develops


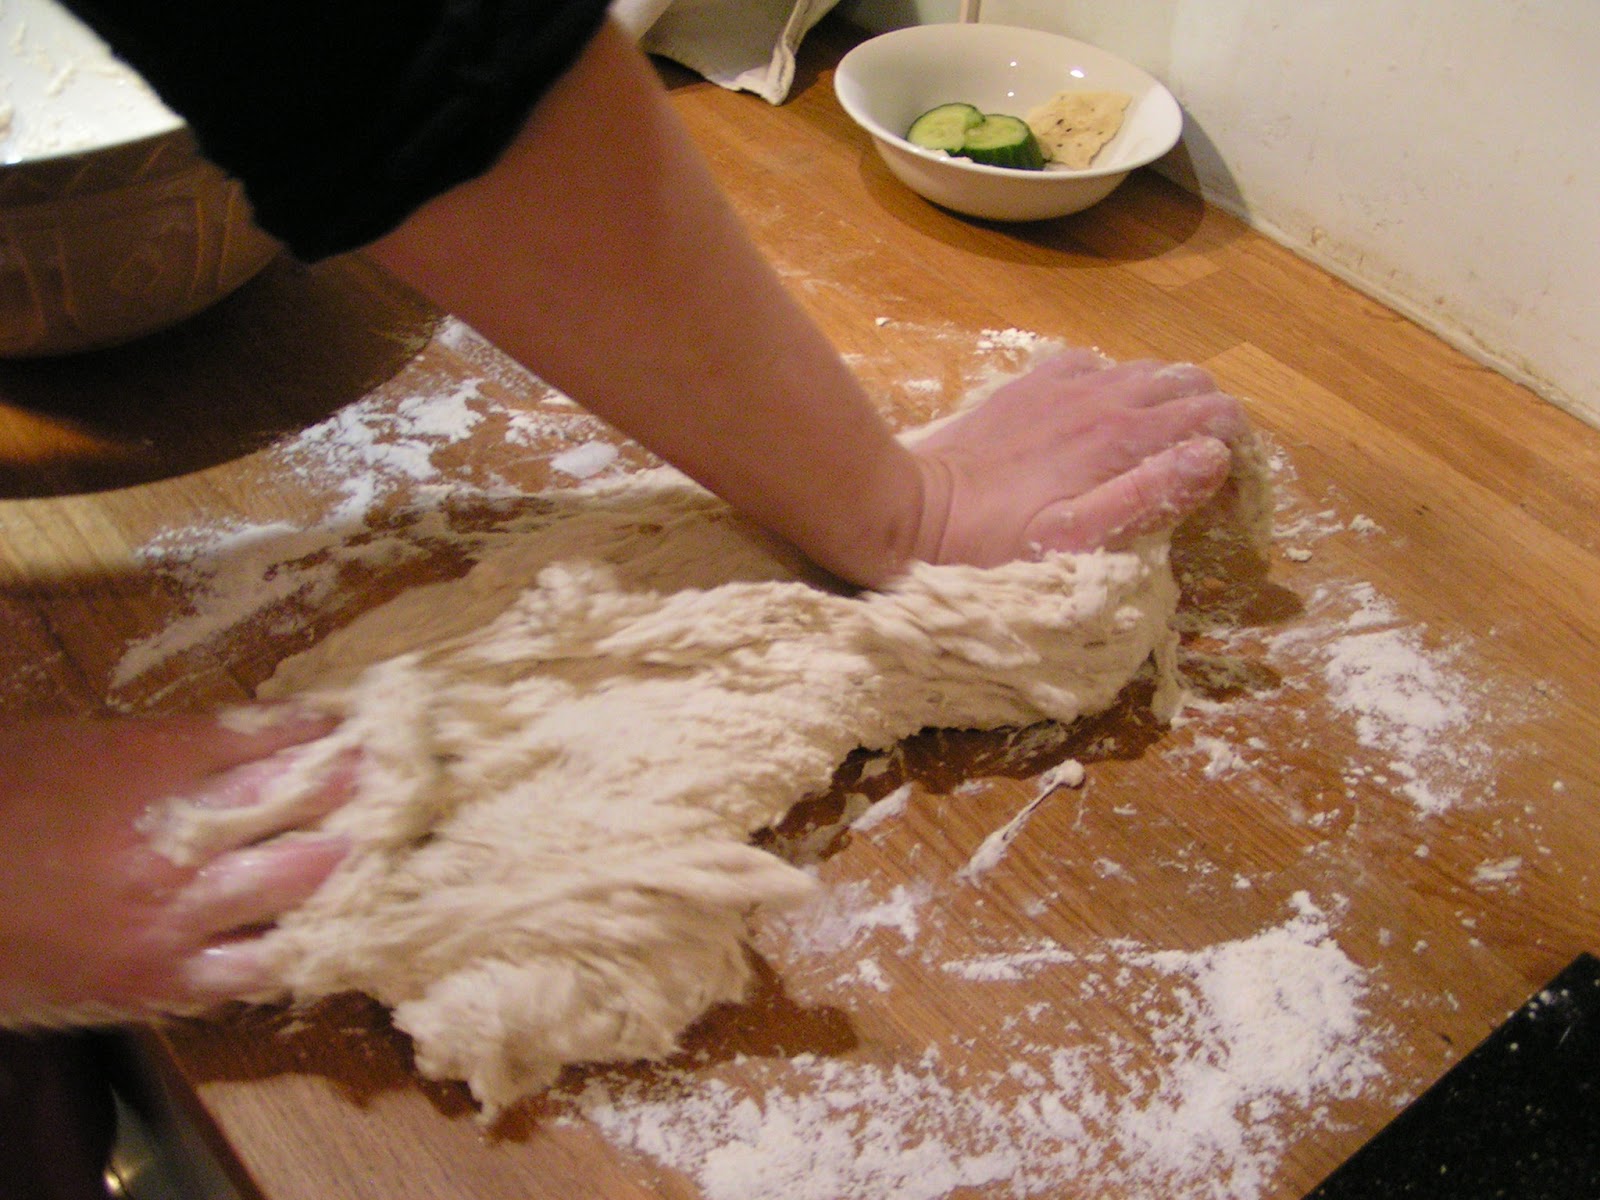
After the last fold. leave the dough for 2 hours, then tip the dough out on a floured surface and shape it into a round. Leave for 20 minutes.


If you have a suitable proving basket, use that. As I wanted to make one big loaf and my proving basket isn't big enough, I lined a bowl with a tea towel and chucked some flour around liberally.


 then shape the dough into a tight ball and pop it in your basket/bowl.

 
At this point you need to leave your bread to prove for at least 4 hours but you can put it in the fridge for up to 3 days to develop the flavour.

When you are ready to bake, if the dough has been in the fridge, get it out and bring the dough up to room temperature.


After 2 days in the fridge

Pre-heat the oven to 220C, and put a baking sheet in to heat up. As with the yeasted loaf, have some semolina to hand to dust the hot baking sheet and also a sprayer bottle with some water in (or a bowl of water to splash round with your hand). You'll need a sharp knife nearby too.

When the oven is at temperature, bring out the baking sheet, dust with semolina and carefully tip the dough on to it. Slash the top of the dough with your sharp knife and get it all back in the oven. The quicker you can do this without sustaining third degree burns, the better... Bake the bread for 20 minutes, then turn it in the oven and bake for another 15 minutes before doing the tap on the bottom thing. if it's sounding hollow, your bread is baked.

Leave to cool on a rack for as long as you can bear before slicing and eating.

Tuesday, 15 January 2013

Sourdough - baking a yeasted loaf


When I started this series of posts, I mentioned that you can use sourdough starter in a yeasted loaf for structure and flavour, or on its own as the only raising agent in your loaf. The latter is more like you might imagine a sourdough loaf to be - quite dense, flavourful and about as far removed from your average pappy white sliced loaf as you can get. We made a fantastic cranberry, yoghurt and orange sourdough loaf on the River Cottage Bread Course:


I made that, I did!
The straight sourdough is something I'll probably use more for eating with cheese or a starter (pate, potted shrimps or something) for a dinner party, although who knows? I'm going to try and recreate these soon, but for day to day eating, the RJ family prefer a yeasted loaf, and that's what I've been baking since the course. 

So a yeasted loaf. You use dried yeast, and the sourdough starter is used for flavour and structure. What I have found works really well is to follow the 'sponge' method - this regardless of whether you are using the sourdough starter in your dough or not. Basically, you mix a third of your ingredients (flour, dried yeast, salt and liquid) together the night before you want to bake - or it will work if you do it in the morning then leave it over the day to bubble up. This is your sponge. When you come to bake your loaf, you add this to the remaining two thirds of your loaf ingredients.

I'm working on the basis of a kilo of flour because that's what I always do. The bread freezes brilliantly so even if you're not going to eat 2 loaves, it's always worth making at least this amount and freezing the second loaf. You can scale the recipe up or down as necessary.

While we're on the subject of ingredients and quantity, I noticed while we were on the River Cottage course that Aidan, the baker who was teaching us, didn't really bother with scales. As he said - he just knows what the right proportions are, basically by eye. He encouraged us to do the same. Well, I'm no where near knowing how much flour I can fit in my hand, so I'm still weighing the dry ingredients out but I am getting better at adding the liquid by eye. You see, apparently, flour is different - even from bag to bag of the same type and brand, so if you can be a bit relaxed about it, and go with what the dough is looking like and feeling like, so much the better.

So have I wurbled enough? Shall we get on with it?

Yeasted White Bread - makes 2 loaves

1kg organic strong white flour plus extra for dusting/flouring worktops and proving baskets
10g dried yeast
20g salt
approx 200ml sourdough starter

fine semolina (for dusting baking sheets)

You will also need a large mixing bowl, tea towels, bread proving baskets, or 2 bowls, each lined with a tea towel, 2 baking sheets, a sharp knife, a water sprayer bottle

So first, make your sponge. Take about a third of your ingredients - you don't need to be exact, but say 300g flour, 3g (about half a sachet) yeast, a good teaspoon of salt - and mix it with about 200ml water. Cover loosely - a tea towel etc - and leave out overnight. Or mix up in the morning and leave for the day.

The next step is where it gets interesting. In a bowl, put the remaining flour, and then separately, the rest of the yeast and salt - apparently, you don't want to put the salt and yeast in to the bowl on top of each other because the salt can damage the dried yeast.


Then, using your fingers like a mixing fork, mix up the dry ingredients -


So now, once it's all mixed together, put about 300ml water in a jug.

Tip the sponge into the flour, and then the 200ml or so of starter, then add around 200ml of the water slowly, but see how the dough is looking and if it can take more (and you can cope with it) add some more. If you aren't using starter, just use more liquid.


flour and sponge - unfortunately forgot to take a pic once the starter was added too

You are aiming for a wet dough, but not too unmanageably wet. It's a bit of a trial and error thing this, but the wetter the dough, the better.


Empty out the dough onto a floured worktop. Then you need to knead. Now you can imagine that it was a bit tricky to take these photos, what with my hands covered with dough, so I enlisted the Husband to help. As I kneaded, he snapped away. Please ignore the bowl of mouldy cucumber slices and old pasta destined for the chickens there in the background.


 Back to the kneading. You're kind of tearing and pulling the dough apart. If it sticks to the work top, scrape it back with your dough scraper or whatever you are using as a dough scraper substitute.


keep going...


...even if it's really sticky - just go with it


...and as you go on, the dough will start to come together,


and eventually you'll end up with a nice ball of dough. You really will, although it might take 10-15 minutes. This is about the most time any of these stages takes.


Once you've got your kneaded dough, put it back in the bowl you started in, and cover with a tea towel. I am also experimenting with using a plastic bag at this stage - 2 carrier bags over the bowl.

You don't need to put the dough anywhere especially warm to rise. I can assure you that our kitchen is definitely cold, but it doesn't seem to be a problem. You can also put your bowl in the fridge at this stage and leave your dough to rise overnight - just remember to bring it back up to room temperature before continuing.

Once your dough has risen, you need to tip it out onto the work surface again, and divide it into 2 to shape your loaves for the second rise


Risen!
So, you need to shape your 2 pieces of dough. This is where I failed to take any pics (or to get the Husband to take any pics) but you need to shape each piece into a round (if you're making a round loaf) by kind of cupping the piece of dough and turning it round in your hands and tucking it underneath. There's a pretty good film here on Loaf Online which is a very interesting website.

The key is to work quite gently, and quickly if you can. When you're done, put the dough, smooth side down, into your bread basket (or tea towel lined bowl) which you have well floured:


Leave your bread to rise again. You can, if necessary, put the dough in the fridge again at this stage (I did it the other night when I forgot that it was going to be too late - just let it come back to room temperature before continuing with the bake) - it will feel springy and have increased in size again. This shouldn't take as long as the first rise, so you can probably put your oven on - heated as high as it will go - or up to 230C.

You need to get yourself organised at this point. Get your baking sheets ready, along with oven gloves, tea towels, a water sprayer bottle (or bowl of water), and make sure you have a sharp knife and your semolina to hand. 


Once your loaves are looking risen and ready to bake, put your baking sheets into the oven for 5-10 minutes to heat up, and while that's going on, gently loosen the dough from the basket by pulling it gently from the side of the basket - in a moment you're going to be tipping it out onto a really hot baking sheet, and you don't want it getting stuck!


 Working quickly, whip your baking sheets out of the oven, dust with semolina and tip out the dough,


Slash the top a few times with a sharp knife


and whack back into the oven. Grab your water sprayer and generously spray all round the oven, or flick water from the bowl round the oven. As an update on my post about bits and pieces you might need, when baking bread, you can get water sprayer bottles in Robert Dyas for 99p. That's 99p well spent, I have to say. No more water sploshed all over the floor by the oven for me.


But I'm digressing.

So your bread is in the oven and it's baking. I've tried baking bread following lots of different temperatures and times. My current preferred method is the one that Aidan Chapman explained on the bread course, which is very straightforward - hot oven, 20-25 minutes, turn the bread round half way through baking. I haven't fiddled much with this in my post-course baking, although I have taken to turning my oven down a smidge once the bread is in - the dial says it gets up to 240 C (fan) and I turn it down to between 220-230 once I've put my bread in, but it's still a work in progress.

When the bread comes out of the oven you need to check that it's cooked - turn it over and give it a tap. It will sound hollow. If it doesn't, take the loaves off the baking tray and put them back into the oven directly onto the oven shelf for 5 minutes or so.

Hopefully you will have loaves that look like this:

Although yours will probably be round!

Or this (although forgive the lighting issues I had with this photo):


So there we have it. I hope this is easy to follow. As I said when I started this, I'm not claiming to be an expert, but I'm giving it a go and making pretty nice bread (if I may say so), so if I can help by answering any questions, just leave a comment or tweet me!

And to recap - making a starter is here; bits and pieces you might or might not need to make bread is here, and a post about looking after your starter is here.

Happy Baking!

Monday, 14 January 2013

Sourdough - the starter reaches adulthood.

So here it is. Your starter has been bubbling away, becoming ever more alive over the last 10 days. You've nurtured it, fed it, talked to - oh. May be that's just me. Anyway, whatever, hopefully it's bubbling away, smelling beery and fermented, a little sour, but not unpleasant. What are you going to do with it?


Well, the first thing you need to do is refresh it. Now don't be alarmed, but after all that, you are going to get rid of about half of it - give it to a friend, perhaps: maybe someone who's been interested in what's been going on on your kitchen work top for the last few days? What ever, give it a mix, discard about half, add some more flour and water, give it another mix and watch it go. Your starter is now fully grown and you can start to bake with it. if you do give it away, the lucky recipients will need to give their newly acquired starter a feed of flour and water and they too will be ready to bake.

If you keep it out in the kitchen, you still need to feed it every day or so with some flour and water, and the idea is that you won't need to 'throw any away' (although you can of course give some to your friends who want to try it out too - just remember to top it up again) because you'll be using it fairly regularly to bake with. However, if you know you're not going to bake with it for a while, you have a few options.

Hugh F-W suggests mixing it down to a stiff paste with flour only, after which it will keep on a work top for 4 days before you need to re-feed it with flour and water. You can also now keep your starter dormant in the fridge for up to 2 weeks, in the same way -  add flour, but not water, to make a stiff paste, cover it and put it in the fridge. Simple. In preparation for using it again, you need to get it out of the fridge and bring it up to room temperature. Give it a good stir and feed it (flour and water) and let it have a couple of hours to bubble up again.

I am lead to believe that you can keep it dormant in the freezer for even longer, but I have never tried it, and surfing around the Googlesphere, I find that you can also dry your starter (check out the comment by Midnight Baker).

Sometimes, you may find that it separates and looks a bit odd, but usually a good whisk to get some air into it will bring it bubbling back to life. It's quite hard to actually kill it off - you do need to keep an eye on it and feed it regularly if it's out on the work top, and if you are keeping it in the fridge, even if you don't bake with it, you probably need to get it out once every 10-14 days, bring it up to room temp, feed it and give it some bubble time.

Posts to follow shortly on actual baking - with apologies for the short delay if you hit the 10 day point over the weekend and were desperate to bake. I got distracted by marmalade...

And to recap, if you are coming new to the sourdough thing at this post, I've posted about getting a starter going, which you can read here. I've also written a post about what you might need (or not need) to bake your bread, which you can read here.

Wednesday, 9 January 2013

Sourdough update - and some sunshine

This is supposed to be a quick follow up post in the whole 'making bread using a sourdough starter' that I kicked off last week, but first, I absolutely must share this photo with you:


And yes. I took this today. This afternoon. It made my heart sing so much to see the sun come creeping tentatively out from behind the grey clouds that I closed down my laptop and took the dog for a bonus walk. It's still muddy underfoot, and I'll have to work this evening, but who cares? The dog was delighted, the sun was shining, I felt its warmth on my back and on my face for the first time since - well, actually, I got a sunny walk on New Year's Day morning but that was 8 days ago and before that, well, I honestly can't remember when. What's more, the daffodils are coming up in the garden, and although I'm not stupid enough to think that winter's over, I feel that I got a brief glimpse of spring.

It's the kind of day to think positive thoughts, and to feel resolved, even if, like me, you're the kind of person who doesn't do well with specific resolutions. A good day, then to think about the sourdough, and to look forward to baking a loaf.

So how are the starters going? Bubbling? Smelling a little bit fermented? A bit beery? Hopefully you're getting into the rhythm of adding to them every day and giving them a good stir. Not long now before they will be good to bake with. If you didn't catch my first post about this and you are interested in having a go, the link is here. On the basis that the starters are up and running, I'm going to have a bit of a run through of what you might or might not need for baking your bread. This is based on making a yeasted loaf (which is what I'm going to do first off) using the sourdough starter for depth of flavour and texture in the loaf, rather than as the only raising agent.

The worst thing is getting all prepared and then realising that you don't have some essential ingredient or piece of kit. And actually, the following applies for any bread, sourdough or not.

In terms of ingredients, you'll need your flour - I muttered a bit about this in the post about the starter. Organic is probably best, and you may want to get your confidence up using strong white. I know it seems to go against the grain, but organic white bread flour is milled in a way that the wheatgerm remains in the flour making it less evil. You can use rye, spelt or wholemeal, and I quite often do half and half, mixing together white and more wholesome flours. The thing is that using white flour does make for a lighter loaf, and you might just want to go with that initially.

As well as flour you will need dried yeast. The stuff that comes in sachets. You can use fresh yeast too if you want but I have yet to handle that beast - as and when I do, I will let you know. Finally, salt. And that's it. I know there are lots of recipes that include oil or other fat, and sugar, but since my personal bread epiphany, I have been making bread without these extras and it's been really great. You'll need water too, but assuming you all have taps, that shouldn't be a problem.

Of course, there are loads of different things you can add to the dough to make delicious loaves, but seeing as how I'm only sharing my experience, I'll try and walk before I can run, and share what I am confident about. I'll be adding nuts and seeds etc later on though, for sure.

Finally, fine semolina. This is really, really good for covering the baking trays before turning out the dough and baking, It stops the dough (and then the bread) sticking, and helps with a nice crust. No soggy bottoms here!


In terms of equipment, well, there are loads of specialist websites selling baking bits and pieces. After I went on the bread course, I bought myself an early Christmas present of a dough scraper and 2 dough baskets which are used for shaping the dough in after the first rise and before baking - you then tip the dough out of the basket, and onto a baking stone or baking tray to bake. You don't need any of this though (although don't let me stop you spending pennies on extra bits for the kitchen cupboards). When I made sourdough bread before, I found that the proving baskets could be emulated using an ordinary bowl lined with a tea towel. The dough scraper might be more useful, especially if you are going to knead directly onto a work surface as you use it to scrape the dough back - and it caan be quite sticky - but you can probably manage fine with a spatula or something similar.


You can of course knead your bread in a Kenwood/Kitchen Aid type affair with a dough hook. I used to do it all the time, and I sometimes still do, but I read somewhere once that you can over-knead bread, so that the gluten starts to break down again. If this happens, it's unrecoverable. While this will never happen (or is very unlikely to happen) hand kneading, there is a real danger with a mixer. And I really enjoyed hand kneading on the course, so that's how I'm going to do it for now.

Tea towels are good to have around to cover the dough while it's rising, and you will need baking trays of some description - baking stones are great, or you can use a paving slab if available (really! you can! in fact Aidan Chapman who ran the River Cottage Bread Course I went on recommended it!). I don't have either, so I just use my normal old baking trays, and they seem to do the job fine.


You'll need a sharp knife to slice into the dough just before it goes into the oven. By making cuts in the uncooked dough, it allows it to 'jump' and expand during the baking process.

A water sprayer, the kind you might mist plants or (so I hear tell) the ironing with, is very useful. Misting the oven as the loaves go in really helps the crust. To my shame - or is that to my irritation - I still haven't sorted this out, despite my intentions, so I alternate between flicking water in from a bowl using my fingers and a bowl, liberally sprinkling the floor in front of the oven and making a big mess, or by having a roasting tin ready to go in the bottom shelf of the oven to be filled with boiling water as the bread goes in to bake.

Finally, a cooling rack, and if like me you are completely prone to burning yourself, oven gloves. 

So there you have it, I think that's everything. Get ready to bake!

Thursday, 3 January 2013

New Years Resolutions - or not - and Sourdough revisited

New Year Resolutions? Not for me, I'm afraid - I have failed too many times with those things I have resolved to do because one year has ended and a new one has begun. When I have really needed to do something - lose weight, give up smoking, those sorts of things, I have eventually managed to just do it, prompted by the sight of a hideous photo (the weight), pregnancy (the smoking) etc. I had to seize the moment - waiting till the New Year would have been pointless.

But there are some things that I have resolved to do recently, and I bet I am not the only one who has been planning to make more bread, and even try sourdough for the first time, or return to it.  As with the more serious matters I have had to tackle in my life, my resolution to return to homemade bread - and to sourdough - came upon me in the hallowed (if temporary) cookery school at River Cottage in the company of Aidan Chapman on the River Cottage Christmas Bread Course in early December.

I've made bread, on and off, for as long as I can remember. My mum made bread too, and I don't remember having to look at a recipe, although I have consulted several tomes and instructions over the years, trying various methods. I had a serious attempt at sourdough earlier last year, but it just kind of petered out, and in the end my starter died while I was on holiday - this shouldn't necessarily have happened, but life got busy, the kids kept complaining, and to be fair, although the bread was lovely, it didn't make the easiest sandwiches for packed lunches.

But no more. As a result of the course, my love of and enthusiasm for real bread has been rekindled. It tastes a million times better than any kind of sliced loaf with a million (well, 18 or so) ingredients, it fills you up more without the bloating of the pappy white bread beloved of my kids (they even call it that themselves - with glee). In addition, it really isn't difficult, or time consuming. It does require a certain amount of attention and forward planning, but in fact, the stages can fit pretty easily into a daily routine. And may be you won't be able to make bread every day, but it's worth having a 'starter' on the go to use at the weekend - just imagine warm crusty bread fresh from your oven, to go with some lovely soup for Saturday lunchtime. You know it makes sense. 

I am not pretending to be an all knowing bread guru, but I reckon I can knock up a fairly good loaf, and I thought I would humbly attempt to share some of the things I have learned about sourdough, how to make and use a 'starter', and, as I am still getting back to grips with it myself, my successes and failures along the way.

So today, first principles.

'Real Bread' is about using natural yeasts as the rising agent. You can combine this with dried yeast too, but having the sourdough and using it in your bread adds to the structure and flavour of your bread.

To make your starter, you need to spend 10 days nurturing a pot of flour and water until it goes bubbly and smells, well, sour. A little bit fermented, if you like. This bit is fairly fundamental - and you need to be OK with the idea of having a living organism bubbling away on your work top, but if you can do that, you're away. It doesn't need to be a warm kitchen (mine is definitely NOT a warm kitchen - unless I'm baking)

it's definitely alive!


You need to start with approx 50g of good bread flour. Organic probably is best - apparently,  the milling process for organic flour means that the wheatgerm is retained in the flour, so even if you use strong white flour, if it's organic, there will be some goodness in it. It's a good idea, though, for your starter to use rye, spelt or wholemeal flour. You can always use strong white flour when you come to make your loaves - and the flavours in the starter will enhance the flavour of your bread. I tend to buy Dove's Farm because they are relatively local, but I am also intending to try out the flour milled by Winchester Mill.


You need a fairly large pot and some cloth to cover it. I've got a piece of muslin, but an old tea towel would be fine. You need to stop flies etc getting in (not such a problem in the winter, granted) but to let the mixture breathe and take the wild yeasts that are all around us in the air. 

Mix your 50g of flour with 50ml of water. Cover and leave till the next day. Do this everyday for 10 days, adding in about 50g of flour and 50ml of water.  Once you've got to the 10 day stage, you can start leaving your starter in the fridge etc when you're not using it, but for the first 10 days, keep it out somewhere!

I'll be back in 10 days time to tell you what to do next - and in the meantime, if you'd like me to remind you to add to your starter, comment below with your Twitter ID and I'll tweet you :-).

Monday, 10 December 2012

River Cottage Christmas Bread Course

In April this year, I was 40.

The Husband took me to Venice, and we had a brilliant party (well, I thought it  was brilliant - it was just what I wanted). I honestly didn't want any presents, but I was very spoiled, and one of the fantastic presents I was lucky enough to be given was a voucher for a River Cottage course. Yes really. Very spoiled.

It will not have escaped the notice of anyone of you lovely people who read this relatively regularly that I am a bit of a fan of Mr Fearnley-Whittingstall and what he stands for. The whole River Cottage thing - even though it's much bigger than it ever was when it was just Hugh and his sports car fresh from London, towing some pigs back to the first River Cottage - I just love it. And while it's surrounded by glorious countryside and is a stone's throw from a wonderful coastline, I'm sure our uncanny ability to end up in the environs of Axminster more often than not when we take off in the camper van has more than a little to do with the presence of River Cottage, a.k.a Park Farm, nestling just outside the town.

Aidan and the fennel top & lemon focaccia
So, anyway a voucher. For a whole day. I won't bore you with the agonies of choice over which course to go for, but a number of factors conspired to find me, yesterday, sleeves rolled up, apron on, making Christmas breads in the company of 17 others, mostly women, a few men, and the brilliantly enthusiastic and passionate Aidan Chapman, proprietor of the Phoenix Bakery in Weymouth. All this after a relaxed cup of coffee and a gorgeous little taster of a salt beef hash bruschetta snackette - just the sort of thing you'd imagine you might get served up at one of the River Cottage parties so beloved of the series'.


The temporary cookery school - a new one is being built


Well, what can I say? It was the most brilliant day.  Despite the bitter cold, even the tractor ride down from the car park to the farm itself was exciting - that first view of the Devon longhouse that I have seen on TV so many times was quite thrilling, and I was almost beside myself to actually get a look inside the farmhouse. That kitchen - wow. The one in all the programmes. Am I sounding star-struck enough yet? 


Despite all this, really, honestly, the best bit was truly the baking. I would say that I am a reasonably competent bread baker, but I've lost a little of my enthusiasm recently - lots of factors conspiring against me. As a result of the day, I am totally fired up again, all my feelings about the value and frankly, the ease of baking amazing bread at home have all been reaffirmed. 

Throughout the day, almost working backwards, Aidan explained the principles of sourdough, used either directly as the raising agent in a loaf, or in a yeasted bread to add structure and depth of flavour. Over the course of the day we made: a cranberry and yoghurt sourdough loaf


a yeasted chestnut and walnut loaf


Before...

...and after


foccacia (flavoured respectively with: fennel tops and lemon, roasted elephant garlic, rosemary and sea salt, leeks and blue cheese)


communal foccacia dough making

 flat breads (which were served, again in true River cottage style with some amazing hummus, some utterly divine coriander lamb, some chicken liver parfait and some egg & garlic mayonnaise. I was too busy eating to take pictures. Just imagine typical HF-W party food. Slurp.)

pear, beer and cheddar soda bread


It's not ugly, OK, it's RUSTIC. And bloody lovely.


Italian Christmas Cookies

a cross between a meringue and a macaroon and utterly gorgeous

and pizza dough which we made our final meal of the day with - wood fired oven pizza - toppings including smoked pheasant, River Cottage cured ham, caramelised onions - are you drooling yet?). Once we'd had our own individually rolled and topped pizzas fired in the oven, it was indoors for warmth ( it was a wee bit chilly outside, despite the temperature of the oven) delicious salads, a Stinger beer, and a chocolate cake to die for (with clotted cream). All in time to stagger back up the hill - well, the tractor staggered up the hill) clutching our bags of bread. The car smelt divine on the way home - and the Husband finished the pizza as we drove back up the A303.
  

The whole day was incredibly relaxed, but we got through a huge amount. It helped that all the ingredients for each loaf came out of the kitchens in smart little bowls, pre-measured - no rummaging around in the depths of the cupboards for that ingredient that you're sure is in there somewhere, but Aidan's passion and enthusiasm for his subject and his openness to questions really inspired a huge amount of confidence in all of us, and as we ate our pizzas, we were all discussing what we would make for Christmas, spurred on by our day.


The best bit of the day for me: I have lost my fear of wet bread dough. I am a convert. No more will I panic and chuck extra flour into the bowl for an easy life. My bread scraper is on order, my starter is up and running again, and my bread is going to be FABULOUS. 

There's a pledge you can hold me to. Watch this space.

Sunday, 29 January 2012

A new bread guru (I'm so fickle)

For this week’s bread, I decided to leave Dan and go back to Hugh – well, to the River Cottage Bread handbook (number 3 in the River Cottage Handbook series). I have been reading Daniel Stevens’ bread-making philosophy for the last few days and was ready to give it a go.

The overall method is much more what I’m used to, and what I like about this Handbook is that there’s a big chapter about the different stages of bread-making, what each is for, and then he gives a basic blueprint recipe referring back to the ‘foundation’chapter, followed by a number of variations. To be fair, Dan Lepard does the same, but in slightly less detail.
I feel like I’m not a novice baker, so took the opportunity to fiddle around with the recipe, using half and half strong white and wholemeal flour. The last batch of Dan L bread I made, I followed the half sponge method for his farmhouse tin loaf, but used half spelt flour and it worked pretty. I am determined to go back to using more wholegrain flour, it’s just a matter of making bread that isn’t completely dense and bricklike with it.

So back to Dan S’s philosophy. In his blueprint recipe, he lists a number of optional extras including a ladleful of sourdough starter. My starter has been languishing at the bottom of the fridge, without so much as a feed, since the Husband broke his tooth on a piece of crackling before Christmas. Neglected and unloved, I thought the chances were slim, but to my surprise, it seems to have survived. I added some as instructed, and then gave the rest of it a feed. I’ll keep it out of the fridge for a few days and see if I can pep it back up.
Rather than using my trusty Kenwood dough hook, I have been hand kneading my bread recently, and I took care to give my bread today a good 10-15 minutes which it seemed to knead. The instruction is to leave the dough to rise wrapped in a bin bag – this I did not have but a plastic carrier bag seemed to do the trick. I followed the instructions to the letter, letting the risen dough rest before being shaped, and then I followed his instructions for shaping what he calls a ‘stubby cylinder’. I left the 2 shaped loaves, coated in oats, to do the second rise wrapped in a floured tea towel, covered again with the plastic bag, and then baked according in a hot oven for 10 mins followed by 30 mins at 180. He gives some helpful cooking guidance for ditherers like me – “Hmm – looks done – has it had enough time? – I’m not sure it’s had enough – may be I should take it out – maybe I should leave it in” and is very supportive about trusting your instinct. I like this.

And was it all worth it? I think it probably was. I am truly thrilled with my loaves. I’ve never got wholemeal rising so well  - even a half and half dough like this batch. How exciting.
UA-44695690-1